
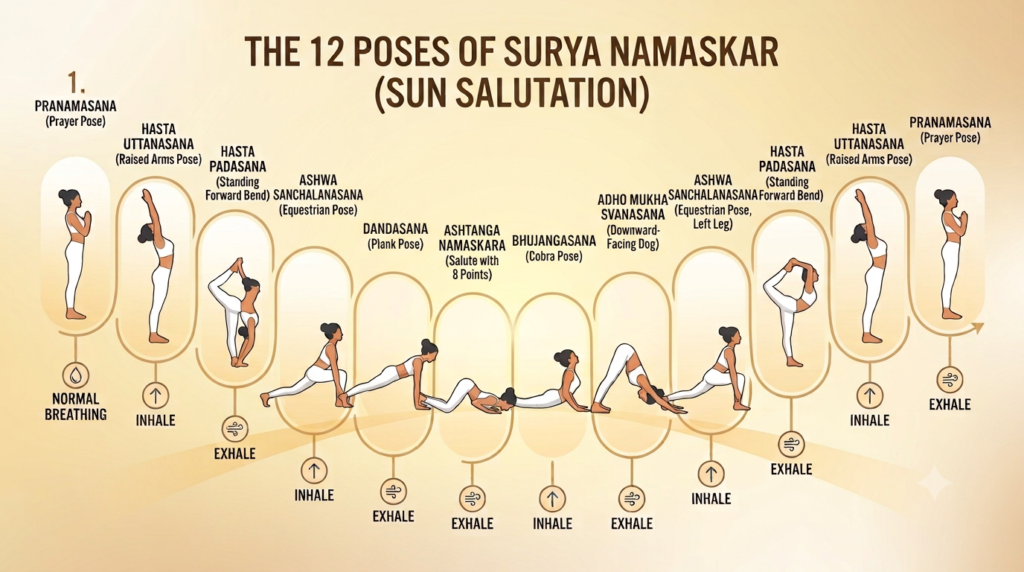
If you’ve searched for the 12 poses of Surya Namaskar, you’re probably looking for an easy, complete breakdown of the practice a method that incorporates breathing, movement, and stretching into a single flow. Surya Namaskar, or Sun Salutation, is one of the most popular yoga sequences in the world, and it’s often the first full-body routine beginners learn.
What is Surya Namaskar?
Surya Namaskar means “salute to the sun” in Sanskrit. It is a sequence of 12 connected poses, performed one after another, traditionally practiced facing the rising sun as a way to welcome the day. Each pose smoothly transitions into the next, synchronized with your inhalation and exhalation, making it both a physical exercise and a breathing exercise. One round of Surya Namaskar consists of 12 poses, but a “full round” often includes 24 poses, as you repeat the sequence on the opposite leg for full-body balance. For beginners, understanding the basic 12 poses of Surya Namaskar in order is the best start.
Benefits of Practicing Surya Namaskar
Before starting the poses, it’s good to understand why this sequence is so highly recommended. However, it’s important to be clear: Yoga can support overall health, but it’s not a cure for medical conditions and shouldn’t replace professional treatment.
Whole-body movement: It works almost every major muscle group in a single sequence, from your shoulders and back to your legs and core.
Improves flexibility: Alternating forward and backward bends gently stretch the spine, hamstrings, and shoulders. Builds strength: Poses like Plank and Upward Dog activate your arm, core, and back muscles. Helps improve breathing: Because each movement involves inhaling and exhaling, it naturally promotes deeper and more mindful breathing.
Can help with energy and focus: Many practitioners use this sequence as a morning routine to feel more alert and centered before starting their day.
Time-saving: A few rounds can serve as both a light cardio warm-up and a stretching routine.
Pose Name Table (Quick Reference)
| No. | Sanskrit Name | English Name | Breath |
|---|---|---|---|
| 1 | Pranamasana | Prayer Pose | Normal breathing |
| 2 | Hasta Uttanasana | Raised Arms Pose | Inhale |
| 3 | Hasta Padasana | Standing Forward Bend | Exhale |
| 4 | Ashwa Sanchalanasana | Equestrian Pose | Inhale |
| 5 | Dandasana | Plank Pose | Exhale |
| 6 | Ashtanga Namaskara | Salute with Eight Points | Exhale |
| 7 | Bhujangasana | Cobra Pose | Inhale |
| 8 | Adho Mukha Svanasana | Downward-Facing Dog | Exhale |
| 9 | Ashwa Sanchalanasana | Equestrian Pose (opposite leg) | Inhale |
| 10 | Hasta Padasana | Standing Forward Bend | Exhale |
| 11 | Hasta Uttanasana | Raised Arms Pose | Inhale |
| 12 | Pranamasana | Prayer Pose | Exhale |
The 12 Poses of Surya Namaskar (Step-by-Step)
Here is the complete sequence, pose by pose, with the breath that goes with each movement.
1. Pranamasana (Prayer Pose)
Stand at the front of your mat with your feet together, weight balanced evenly on both feet. Bring your palms together in front of your chest, like a prayer gesture. Relax your shoulders and take a normal breath.
Breath: Normal breathing.
Focus: This is your starting point take a moment to center yourself before beginning the flow.
2. Hasta Uttanasana (Raised Arms Pose)
Inhale as you lift your arms overhead, palms facing forward, and gently arch your body backward from the hips. Keep your arms close to your ears and avoid straining your neck.
Breath: Inhale.
Focus: This pose stretches your abdomen and opens your chest, preparing your spine for the forward fold that follows.
3. Hasta Padasana (Standing Forward Bend)
Exhale as you bend forward from your hips, bringing your hands down toward the floor beside your feet. Keep your spine as long as possible rather than rounding sharply; bend your knees slightly if your hamstrings feel tight.
Breath: Exhale.
Focus: This forward fold stretches the back of your legs and releases tension in your lower back.
4. Ashwa Sanchalanasana (Equestrian Pose)
Inhale as you step your right leg back into a deep lunge, keeping your left foot between your hands. Lift your chest and gaze slightly upward, keeping your left knee stacked over your ankle.
Breath: Inhale.
Focus: This lunge stretches your hip flexors and strengthens your legs.
5. Dandasana (Plank Pose)
Exhale as you step your left leg back to meet the right, coming into a straight-line plank position. Keep your shoulders stacked over your wrists, core engaged, and body in one straight line from head to heels.
Breath: Exhale.
Focus: This pose builds core, shoulder, and arm strength.
6. Ashtanga Namaskara (Salute with Eight Points)
Gently lower your knees, chest, and chin to the floor, keeping your hips slightly raised. Your toes, knees, chest, hands, and chin should touch the ground eight points of contact in total.
Breath: Exhale (or a brief pause after the exhale, depending on the style you’re practicing).
Focus: This transitional pose builds strength in the arms and chest while keeping the flow moving smoothly.
7. Bhujangasana (Cobra Pose)
Inhale as you slide forward and lift your chest off the floor, keeping your elbows slightly bent and your shoulders away from your ears. Your hips and legs stay grounded on the mat.
Breath: Inhale.
Focus: This backbend opens your chest and strengthens your lower back.
8. Adho Mukha Svanasana (Downward-Facing Dog)
Exhale as you lift your hips upward and back, forming an inverted V-shape with your body. Press your heels toward the floor and keep your spine long.
Breath: Exhale.
Focus: This pose stretches your hamstrings, calves, and shoulders while building strength in your arms.
9. Ashwa Sanchalanasana (Equestrian Pose, Opposite Leg)
Inhale as you step your right foot forward between your hands, returning to the lunge position, mirroring pose 4 but on the opposite side.
Breath: Inhale.
Focus: This balances the earlier hip flexor stretch on the other leg.
10. Hasta Padasana (Standing Forward Bend)
Exhale as you bring your left foot forward to meet the right, returning to the standing forward fold.
Breath: Exhale.
Focus: This repeats the hamstring and lower back stretch from pose 3.
11. Hasta Uttanasana (Raised Arms Pose)
Inhale as you roll your spine up to standing, sweeping your arms overhead and arching gently backward, just as in pose 2.
Breath: Inhale.
Focus: This completes the backbend portion of the sequence, opening the chest once more.
12. Pranamasana (Prayer Pose)
Exhale as you bring your body back to standing, palms together at your chest, returning to your starting position.
Breath: Exhale.
Focus: This closes the sequence, bringing you back to a centered, balanced stance.
To complete a full round, repeat the sequence, stepping back with the opposite leg in poses 4 and 9, so both sides of your body get an equal stretch.
Muscles Worked in Surya Namaskar
One of the reasons this sequence is so popular is that it engages muscles across your entire body rather than isolating just one area.
Pose
| Pose | Primary Muscles Worked |
|---|---|
| Prayer Pose | Core, shoulders (postural muscles) |
| Raised Arms Pose | Abdominals, shoulders, back extensors |
| Standing Forward Bend | Hamstrings, calves, lower back |
| Equestrian Pose | Hip flexors, quadriceps, glutes |
| Plank Pose | Core, shoulders, arms, chest |
| Salute with Eight Points | Chest, arms, shoulders |
| Cobra Pose | Lower back, chest, shoulders |
| Downward-Facing Dog | Hamstrings, calves, shoulders, back |
| Equestrian Pose (opposite leg) | Hip flexors, quadriceps, glutes |
| Standing Forward Bend | Hamstrings, calves, lower back |
| Raised Arms Pose | Abdominals, shoulders, back extensors |
| Prayer Pose | Core, shoulders (postural muscles) |
Throughout the round, you’re essentially training your legs, core, back, shoulders, arms, and chest which is why this sequence is often used as a quick full-body warm-up before a longer workout or yoga class.
Sun Salutation Calories Burned
A common estimate is that a full round of Sun Salutations burns approximately 12 to 15 calories, although this figure can vary greatly depending on your body weight, pace, and effort level. Someone who performs this sequence quickly and with more force will burn more calories than someone who practices slowly and leisurely. a
Here’s a rough estimate based on body weight and pace, for reference only:
| Body Weight | Calories per Round (Approx.) | Calories for 12 Rounds (Approx.) |
|---|---|---|
| 50–60 kg | 10–12 | 120–145 |
| 60–70 kg | 12–14 | 145–170 |
| 70–80 kg | 14–16 | 170–195 |
These numbers are general approximations, not precise clinical measurements, since calorie burn depends on many individual factors like fitness level, speed, and how deeply each pose is held. If your goal is calorie tracking for weight management, a fitness tracker or consultation with a professional will give you more accurate, personalized numbers.
12 Surya Namaskar Mantras
In traditional practice, each of the 12 poses is paired with a mantra dedicated to one of the names of the sun. Chanting these mantras is entirely optional many modern practitioners skip them and focus purely on the movement and breath, while others include them for a more meditative, traditional experience. If you choose to include them, they’re typically recited silently or softly, one per pose, as you move through the sequence.
| No. | Surya Mantra | Meaning |
|---|---|---|
| 1 | Om Mitraya Namaha | Salutations to the friend of all. |
| 2 | Om Ravaye Namaha | Salutations to the shining one. |
| 3 | Om Suryaya Namaha | Salutations to the one who induces activity. |
| 4 | Om Bhanave Namaha | Salutations to the one who illuminates. |
| 5 | Om Khagaya Namaha | Salutations to the one who moves through the sky. |
| 6 | Om Pushne Namaha | Salutations to the giver of strength and nourishment. |
| 7 | Om Hiranyagarbhaya Namaha | Salutations to the golden cosmic self. |
| 8 | Om Marichaye Namaha | Salutations to the lord of the dawn. |
| 9 | Om Adityaya Namaha | Salutations to the son of Aditi (cosmic mother). |
| 10 | Om Savitre Namaha | Salutations to the one who inspires. |
| 11 | Om Arkaya Namaha | Salutations to the one fit for praise. |
| 12 | Om Bhaskaraya Namaha | Salutations to the one who gives light. |
These mantras come from traditional yogic and Vedic texts and are meant to reflect the qualities of the sun as a source of life and energy. Including them can add a reflective, meditative layer to your practice, but skipping them doesn’t take away from the physical or breathing benefits of the sequence.
Simple Breathing Pattern to Remember
Surya Namaskar Breathing Pattern
If you’re new to the sequence, here’s an easy way to remember the breath pattern:
- Inhale: Poses 2, 4, 7, 9, 11
- Exhale: Poses 3, 5, 6, 8, 10, 12
- Normal breathing: Pose 1
Once this rhythm feels natural, the entire sequence begins to feel like one continuous, flowing movement rather than 12 separate poses.
Common Mistakes to Avoid
Even though this sequence seems easy, some common mistakes can cause unnecessary strain or reduce the effectiveness of your practice.
- Rushing through the poses: Moving too quickly can disconnect your breath from your movement. Slow down and breathe smoothly with each movement.
- Skipping the warm-up: If your body feels stiff, a few minutes of gentle movement can help prepare your body, especially your shoulders and hamstrings.
- Overarching the lower back: In poses like Cobra and Raised Arms Pose, avoid forcing a deep backbend. Keep the movement comfortable.
- Shrugging your shoulders in Plank Pose: Keep your shoulders aligned over your wrists and avoid letting your chest collapse.
- Holding your breath: Let your breath flow naturally with each movement. Avoid holding your breath just to complete a pose.
How Many Rounds Should Beginners Practice?
If you’re just starting out, 2 to 4 rounds can be a reasonable starting point. As your stamina and comfort improve, you can gradually work toward 8 to 12 rounds. Focus on smooth, controlled movements and proper breathing rather than rushing through a large number of rounds.
What Is the Best Time to Practice Surya Namaskar?
Traditionally, Surya Namaskar is practiced in the morning, often facing the rising sun, and is commonly done on an empty stomach. However, you can practice at a time that fits your schedule. Consistency is more important than following a specific time.
If you practice in the evening, allow enough time after a meal to feel comfortable before beginning your practice.
Who Should Be Cautious When Doing Surya Namaskar?
Although Surya Namaskar can be adapted for many people, some individuals may need modifications or professional guidance, including:
- Pregnant people, especially after the first trimester
- People with high blood pressure or heart conditions
- People with wrist, shoulder, or back injuries
- People recovering from recent surgery
If any of these situations apply to you, consider speaking with a qualified healthcare professional or practicing with a qualified yoga instructor who can recommend appropriate modifications.
Surya Namaskar Variations for Beginners
If some poses feel too challenging at first, try these modifications:
- Tight hamstrings: Bend your knees during Standing Forward Bend.
- Plank feels difficult: Practice with your knees supported on the floor.
- Lower-back sensitivity: Try a gentle Baby Cobra instead of a deeper backbend.
- Need more time: Pause briefly between poses to regain a comfortable breathing rhythm
What are the 12 poses of Surya Namaskar in order?
The sequence is: Prayer Pose, Raised Arms Pose, Standing Forward Bend, Equestrian Pose, Plank Pose, Salute with Eight Points, Cobra Pose, Downward-Facing Dog, Equestrian Pose (opposite leg), Standing Forward Bend, Raised Arms Pose, and Prayer Pose.
How many calories does Surya Namaskar burn?
One round burns approximately 12 to 15 calories on average, though this varies based on body weight, pace, and effort. Practicing multiple rounds can add up to a meaningful amount of light cardio activity over a session.
Which muscles does Surya Namaskar work?
It’s a full-body sequence that engages your legs, core, back, shoulders, arms, and chest across the 12 poses.
Are the Surya Namaskar mantras necessary?
No, they’re entirely optional. The mantras are a traditional addition tied to the spiritual and meditative side of the practice, but the physical and breathing benefits remain the same whether or not you chant them.
How many rounds of Surya Namaskar should I do daily?
Beginners can start with 2 to 4 rounds and gradually build up to 8 to 12 rounds as strength and stamina improve.
Is Surya Namaskar good for weight loss?
It can be a helpful part of an active lifestyle and may support calorie burning when practiced regularly, but it works best when combined with a balanced diet and isn’t a guaranteed weight-loss solution on its own.
Can beginners do Surya Namaskar every day?
Yes, most healthy adults can practice it daily. Beginners should start slow, focus on form, and listen to their body rather than pushing through discomfort.
What is the correct breathing pattern for Surya Namaskar?
Generally, you inhale during backward-bending or expanding poses and exhale during forward-bending or contracting poses, as outlined in the step-by-step breakdown above.
Can I do Surya Namaskar at night?
Yes, though the traditional recommendation is morning practice. If practicing at night, allow a gap of a few hours after eating and keep the pace calm rather than energizing right before bed.
Final Thoughts
Learning the 12 poses of Surya Namaskar gives you one of the most complete and time-efficient yoga sequences available combining strength, flexibility, and breath awareness in a single flow. Whether you choose to add the traditional mantras or simply focus on movement and breath, the key to getting the most out of it isn’t speed or intensity; it’s moving slowly enough to stay connected to your breath in every pose.
Start with a few rounds, focus on smooth transitions, and let your practice build naturally over time. With consistency, this simple 12-pose sequence can become one of the most valuable parts of your daily routine.